Recent Questions
Q: I need to create a link drop down menu for a site that has the top level menuhave no border but I want any of the sub menu popups to have aborder around them (or a different background color for the menuarea for the popup). I can not see a way to do this? If a put a menu border on it appears on both the top level and any submenu popups.
A: You should set the following parameters:
1) var menuBorderWidth=0;
2) Create Submenu Style
var menuStyles = [
["menuBorderWidth=1","menuBorderStyle=solid","menuBorderColor=#7E5927"], //style 0
];
You can do it in Deluxe Tuner. Click "Edit Individual Styles" and thenchoose "Submenu Styles" tab.
3) Assign Individual Style for your submenus.
You can assign them only for the first item in each submenu.
For example:
var menuItems = [
["Home","testlink.html", "", "", "", "", "", "", "", ],
["Product Info","", "default.files/icon1.gif", "default.files/icon1o.gif", "", "", "", "", "", ],
["|Features","testlink.html", "default.files/icon2.gif", "default.files/icon2o.gif", "", "", "", "0", "", ], //style 0
["|Installation","", "default.files/icon2.gif", "default.files/icon2o.gif", "", "", "", "", "", ],
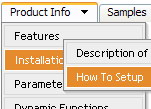
["||Description of Files","testlink.html", "default.files/icon6.gif", "default.files/icon6o.gif", "", "", "", "0", "", ], //style 0
["||How To Setup","testlink.html", "default.files/icon6.gif", "default.files/icon6o.gif", "", "", "", "", "", ],
["|Parameters Info","testlink.html", "default.files/icon2.gif", "default.files/icon2o.gif", "", "", "", "", "", ],
Q: Shouldn’t the dhtml expand menu know what page you are on and expand accordingly?
Or would you need to ‘hard code’ each page to be expanded basedon that page?
A: You should set the following parameter
var ttoggleMode=1;
Deluxe Tree doesn't save a presseditem as it saves a tree state. It works within 1 page only and if youreload the page you should set a pressed item using Javascript API:
function dtreet_ext_setPressedItem (menuInd, itemID)
Please, see here:
http://deluxe-tree.com/functions-info.html
You can also set
var tsaveState = 1;
More info you can find
http://deluxe-tree.com/data-samples/tree-menuxp-save-state.htm
To expand specific items you should use API function
function dtreet_ext_expandItem (itemID, expand)
Try that.
Q: I am setting a menu up for popupMode=1 and adding the javascript to respond to the onContextMenu action. When it pops up I am having to immediately move the mouse over the menu to keep it visible. Is there any way to keep the menu from doing this?
A: You can try to play with these parameters:
var smShowPause=200;
var smHidePause=1000;
Q: I made my own multi-users Content Management System and I'm using deluxe menu developer license to create my menu into this application.
One dhtml menu vertical constantly need to be reload to see new page created/modified or deleted by other logged users. So I just take out your code for Ajax sample to fill dynamically this submenu.
There is my .js file fort my menu : mnu_admin.zip (You'll need to extract the .js file)
In this file I'm using the same way it goe's into your example with Ajax on line : [172] ["Contenu pages","", "", "", "Gйrer les pages du site", "", "0", "0", "modules/menu/data-ajax3.js", ],
There is my : data-ajax3.js (periodically change)
var menuItems = [
["|Services", "contenu_pages_a.php?id=HMglcKWvAQklxw4uM3qHWa9pFhY432dZNIXOIlYNJO4%3D", "", "", "Services", "", "", "", ""],
["|Documentation", "contenu_pages_a.php?id=iG31PyfJ%2BswDBJPcn61IXgczwXkePaDclD6DPsxAUKE%3D", "", "", "Documentation", "", "", "", ""],
["|Soutien financier","contenu_pages_a.php?id=tIACTxYwfsey%2FBGr0ROjAXGggU3LdglWtxMTyTVINtU%3D","", "", "Soutien financier", "", "", "", ""],
["|Programmes","contenu_pages_a.php?id=A7v%2BWOmpw4syUqHRcPizZjUwh9TzxyuYm5f1yi7EiGM%3D","", "", "Programmes", "", "", "", ""],
["||ARLPHAT","contenu_pages_a.php?id=SGe4LNdC8O%2BG5eDd1fgkfkK3lKE80KZL0Pi8o3zGo3Y%3D","", "", "ARLPHAT", "", "", "", ""],
["||Association des scouts","contenu_pages_a.php?id=nZVnC9wzyyojxSJI7Lfe7FpTceVEbsdlHy9vURCyULk%3D", "","", "Association des scouts", "", "", "", ""],
["||Secondaire en spectacle","contenu_pages_a.php?id=io2hWjkLPlP%2Fcum%2FzIVoV%2FrWYskolQgvLKpc%2FJc%2FRBo%3D", "", "", "Secondaire en spectacle", "", "", "", ""],
["||Sport йtudiant","contenu_pages_a.php?id=0fY3UenTH2Rri4AD72RKj7qz8EuwBxG3K0IaXLTqyjM%3D", "","", "Sport йtudiant", "", "", "", ""],
["||Jeux du Quйbec","contenu_pages_a.php?id=lZL5TyT9RFsRE2kzAPJisP4ZAAwcfiHG3JTKS6Ey9%2BE%3D","", "", "Jeux du Quйbec", "", "", "", ""],
];
Another user just delete differents pages so the data_ajax3.js change to this (example) :
var menuItems = [
["|Services","contenu_pages_a.php?id=HMglcKWvAQklxw4uM3qHWa9pFhY432dZNIXOIlYNJO4%3D", "","", "Services", "", "", "", ""],
["|Documentation", "contenu_pages_a.php?id=iG31PyfJ%2BswDBJPcn61IXgczwXkePaDclD6DPsxAUKE%3D", "", "", "Documentation", "", "", "", ""],
["|Soutien financier", "contenu_pages_a.php?id=tIACTxYwfsey%2FBGr0ROjAXGggU3LdglWtxMTyTVINtU%3D", "", "", "Soutien financier", "", "", "", ""],
["|Programmes", "contenu_pages_a.php?id=A7v%2BWOmpw4syUqHRcPizZjUwh9TzxyuYm5f1yi7EiGM%3D", "", "", "Programmes", "", "", "", ""],
["||ARLPHAT", "contenu_pages_a.php?id=SGe4LNdC8O%2BG5eDd1fgkfkK3lKE80KZL0Pi8o3zGo3Y%3D", "", "", "ARLPHAT", "", "", "", ""],
["||Association des scouts", "contenu_pages_a.php?id=nZVnC9wzyyojxSJI7Lfe7FpTceVEbsdlHy9vURCyULk%3D", "", "", "Association des scouts", "", "", "", ""],
["||Secondaire en spectacle", "contenu_pages_a.php?id=io2hWjkLPlP%2Fcum%2FzIVoV%2FrWYskolQgvLKpc%2FJc%2FRBo%3D", "", "", "Secondaire en spectacle", "", "", "", ""],
["||Sport йtudiant", "contenu_pages_a.php?id=0fY3UenTH2Rri4AD72RKj7qz8EuwBxG3K0IaXLTqyjM%3D", "", "", "Sport йtudiant", "", "", "", ""],
["||Jeux du Quйbec", "contenu_pages_a.php?id=lZL5TyT9RFsRE2kzAPJisP4ZAAwcfiHG3JTKS6Ey9%2BE%3D", "", "", "Jeux du Quйbec", "", "", "", ""],
];
Trouble :
When I go over "Contenu pages" menu, the submenu won't reload and still show me the new submenu with upper content (With "Qui sommes-nous"). I need to completely refresh the page and sometime to delete browser CACHE.
What I want to do :
I want to get submenu completely reload everytime I pass over "Contenu pages" dhtml menu vertical with the mouse.
Tested Browser :
IE6 and FF3
A: Try to set the following parameter to reload submenus on recall:
var ajaxReload=1;